For 1990-2009 cars only
Fuel Sender Assembly Replacement for Buick Roadmaster 1996
Removal Procedure
- Disconnect the negative battery cable.
- Relieve the fuel system pressure. Refer to the Fuel Pressure Relief Procedure.
- Drain the fuel tank. Refer to Draining Fuel Tank.
- Remove the fuel tank. Refer to Fuel Tank and Fuel Filler Pipe Replacement.
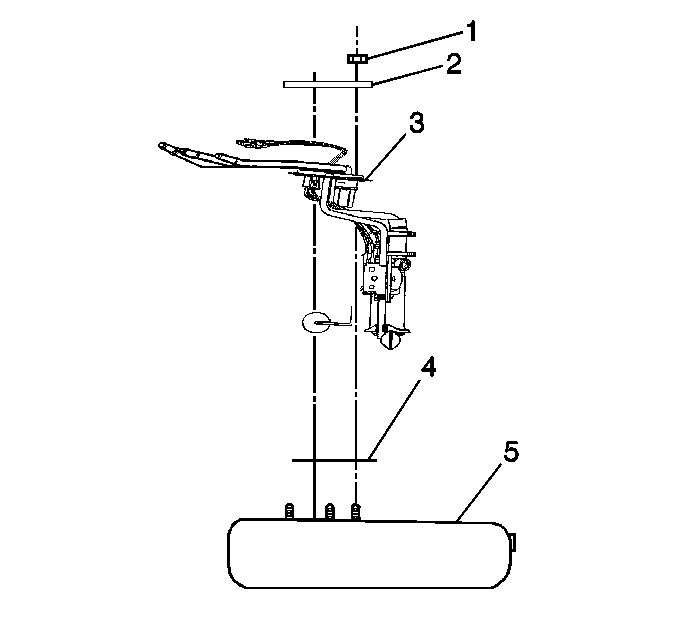
- Remove the fuel sender assembly retaining nuts (1), the retaining ring (2), the fuel sender assembly (3), and the gasket (4). Discard the gasket.
- Clean the gasket sealing surfaces.
Caution: In order to reduce the risk of fire and personal injury that may result from a fuel leak, always replace the fuel sender gasket when reinstalling the fuel sender assembly.
Notice: Do Not handle the fuel sender assembly by the fuel pipes. The amount of leverage generated by handling the fuel pipes could damage the joints.
Installation Procedure
- Position the new gasket (4) on the fuel tank (5).
- Install the fuel sender assembly (3), the retaining ring (2), and the fuel sender retaining nuts (1).
- Install the fuel tank. Refer to Fuel Tank and Fuel Filler Pipe Replacement.
- Add fuel.
- Install the fuel filler cap.
- Connect the negative battery cable.
- Inspect for leaks.
Important: Do Not fold over or twist the fuel pump strainer when installing the fuel sender assembly as this will restrict fuel flow. Also, assure that the fuel pump strainer does not block full travel of the float arm.
Tighten
Tighten the fuel sender assembly retaining nuts alternately and evenly
to 3 N·m (27 lb in).
| 7.1. | Turn the ignition switch ON for 2 seconds. |
| 7.2. | Turn the ignition switch OFF for 10 seconds. |
| 7.3. | Turn the ignition switch ON. |
| 7.4. | Check for fuel leaks. |
