Air Conditioning Compressor Replacement for Chevrolet Monte Carlo 2000
Air Conditioning Compressor Replacement 3.4L
Removal Procedure
- Disconnect the negative battery cable. Refer to Battery Negative Cable Disconnection and Connection in Engine Electrical.
- Remove the LH fender diagonal brace. Refer to Front Fender Upper Diagonal Brace Replacement in Body Front End.
- Remove the cross vehicle brace. Refer to Cross Vehicle Brace Replacement in Body Front End.
- Recover the refrigerant. Refer to Refrigerant Recovery and Recharging .
- Remove the accessory drive belt. Refer to Drive Belt Replacement in Engine Mechanical - 3.4L.
- Raise and support the vehicle. Refer to Lifting and Jacking the Vehicle in General Information.
- Remove the right side engine splash shield. Refer to Engine Splash Shield Replacement in Body Front End.
- Remove the lower air deflector. Refer to Radiator Air Baffle Assemblies and Deflectors in Engine Cooling.
- Disconnect the electrical connector from the compressor.
- Remove the compressor hose assembly at the compressor. Refer to Compressor Hose Assembly Replacement .
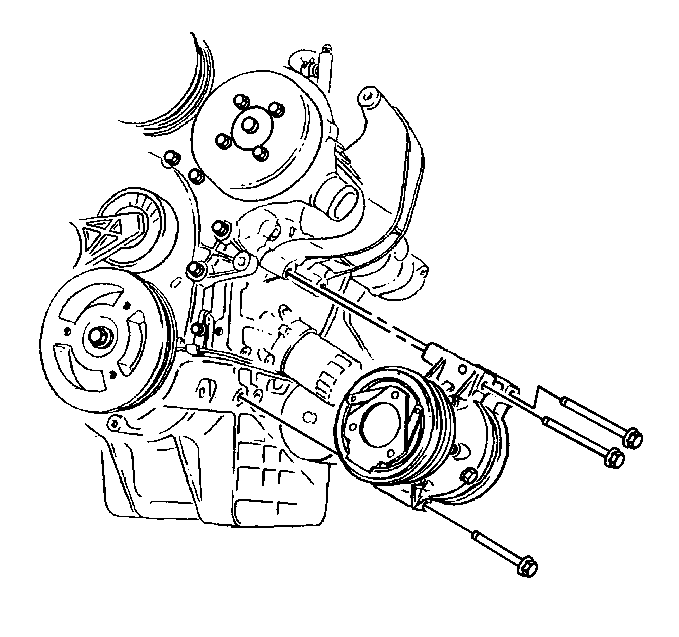
- Remove the lower mounting bolt.
- Remove the two upper mounting bolts.
- Remove the compressor from the vehicle.
Installation Procedure
Important: Replacement A/C compressors are shipped without oil (dry). Add 60 ml (2 oz) of synthetic refrigerant lubricant (PAG).
- Install the compressor to the vehicle.
- Install the two upper mounting bolts.
- Install the lower mounting bolt.
- Install the compressor hose assembly to the compressor. Refer to Compressor Hose Assembly Replacement .
- Connect the electrical connector to the compressor.
- Install the lower air deflector. Refer to Radiator Air Baffle Assemblies and Deflectors in Engine Cooling.
- Install the right side engine splash shield. Refer to Engine Splash Shield Replacement in Body Front End.
- Lower the vehicle.
- Install the accessory drive belt. Refer to Drive Belt Replacement in Engine Mechanical - 3.4L.
- Evacuate and charge the system. Refer to Refrigerant Recovery and Recharging .
- Inspect the system for leaks. Refer to Leak Testing .
- Install the cross vehicle brace. Refer to Cross Vehicle Brace Replacement in Body Front End.
- Install the LH fender diagonal brace. Refer to Front Fender Upper Diagonal Brace Replacement in Body Front End.
- Connect the negative battery cable. Refer to Battery Negative Cable Disconnection and Connection in Engine Electrical.
Notice: Use the correct fastener in the correct location. Replacement fasteners must be the correct part number for that application. Fasteners requiring replacement or fasteners requiring the use of thread locking compound or sealant are identified in the service procedure. Do not use paints, lubricants, or corrosion inhibitors on fasteners or fastener joint surfaces unless specified. These coatings affect fastener torque and joint clamping force and may damage the fastener. Use the correct tightening sequence and specifications when installing fasteners in order to avoid damage to parts and systems.
Tighten
Tighten the compressor top bolts to 50 N·m (37 lb ft).
Tighten
Tighten the compressor bottom bolt to 50 N·m (37 lb ft).
Important: Lubricate the new sealing washers with mineral base 525 viscosity refrigerant oil.
Air Conditioning Compressor Replacement 3.8L
Removal Procedure
- Disconnect the negative battery cable. Refer to Battery Negative Cable Disconnection and Connection in Engine Electrical.
- Remove the LH fender diagonal brace. Refer to Front Fender Upper Diagonal Brace Replacement in Body Front End.
- Remove the cross vehicle brace. Refer to Cross Vehicle Brace Replacement in Body Front End.
- Recover the refrigerant. Refer to Refrigerant Recovery and Recharging .
- Remove the accessory drive belt. Refer to Drive Belt Replacement in Engine Mechanical - 3.8L.
- Raise and support the vehicle. Refer to Lifting and Jacking the Vehicle in General Information.
- Remove the right side engine splash shield. Refer to Engine Splash Shield Replacement in Body Front End.
- Remove the lower air deflector. Refer to Radiator Air Baffle Assemblies and Deflectors in Engine Cooling.
- Disconnect the electrical connector from the compressor.
- Remove the compressor hose assembly from rear of the compressor. Refer to Compressor Hose Assembly Replacement .
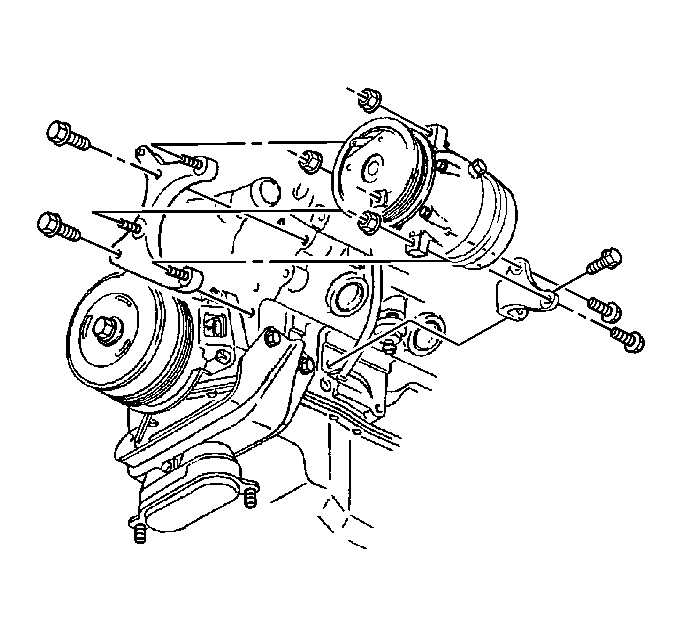
- Remove the rear compressor mounting bracket.
- Remove the compressor mounting nuts.
- Remove the compressor.
- Remove the bracket with the mounting bolts, if necessary.
Installation Procedure
Important: Replacement A/C compressors are shipped without oil (dry). Add 60 ml (2 oz) of synthetic refrigerant lubricant (PAG).
- Install the bracket with the upper mounting bolt, if necessary.
- Install the bracket with the lower mounting bolt, if necessary.
- Install the compressor to the vehicle.
- Install the compressor nuts.
- Install the rear compressor bracket and bolts.
- Install the compressor hose assembly to the rear of the compressor. Refer to Compressor Hose Assembly Replacement .
- Connect the electrical connector to the compressor.
- Install the lower air deflector. Refer to Radiator Air Baffle Assemblies and Deflectors in Engine Cooling.
- Install the right side engine splash shield. Refer to Engine Splash Shield Replacement in Body Front End.
- Lower the vehicle.
- Install the accessory drive belt. Refer to Drive Belt Replacement in Engine Mechanical - 3.8L.
- Evacuate and recharge the A/C system. Refer to Refrigerant Recovery and Recharging .
- Inspect the A/C system for leaks. Refer to Leak Testing .
- Install the cross vehicle brace. Refer to Cross Vehicle Brace Replacement in Body Front End.
- Install the LH fender diagonal brace. Refer to Front Fender Upper Diagonal Brace Replacement in Body Front End.
- Connect the negative battery cable. Refer to Battery Negative Cable Disconnection and Connection in Engine Electrical.
Notice: Use the correct fastener in the correct location. Replacement fasteners must be the correct part number for that application. Fasteners requiring replacement or fasteners requiring the use of thread locking compound or sealant are identified in the service procedure. Do not use paints, lubricants, or corrosion inhibitors on fasteners or fastener joint surfaces unless specified. These coatings affect fastener torque and joint clamping force and may damage the fastener. Use the correct tightening sequence and specifications when installing fasteners in order to avoid damage to parts and systems.
Tighten
Tighten the compressor bracket upper bolt to 50 N·m (37 lb ft).
Tighten
Tighten the compressor bracket lower bolt to 80 N·m (59 lb ft).
Tighten
Tighten the compressor front nuts to 100 N·m (74 lb ft).
Tighten
Tighten the Compressor rear bolts to 31 N·m (23 lb ft).
Important: Lubricate the new sealing washers with mineral base 525 viscosity refrigerant oil.
