Underhood Fuse Block Replacement for Pontiac Firebird 1999
Removal Procedure
The underhood electrical center is part of the forward lamp wiring harness.
The underhood electrical center and harness must be replaced as a complete
assembly.
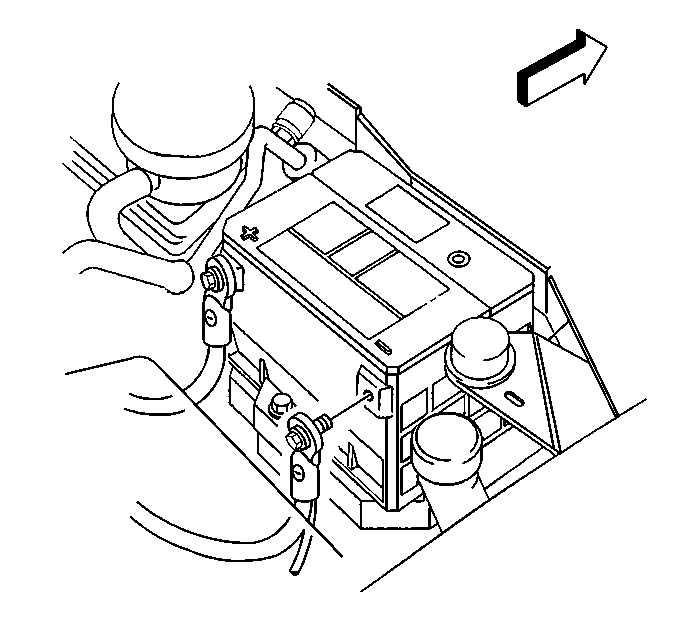
- Disconnect the negative
battery cable. Refer to
Battery Negative Cable Disconnection and Connection
.
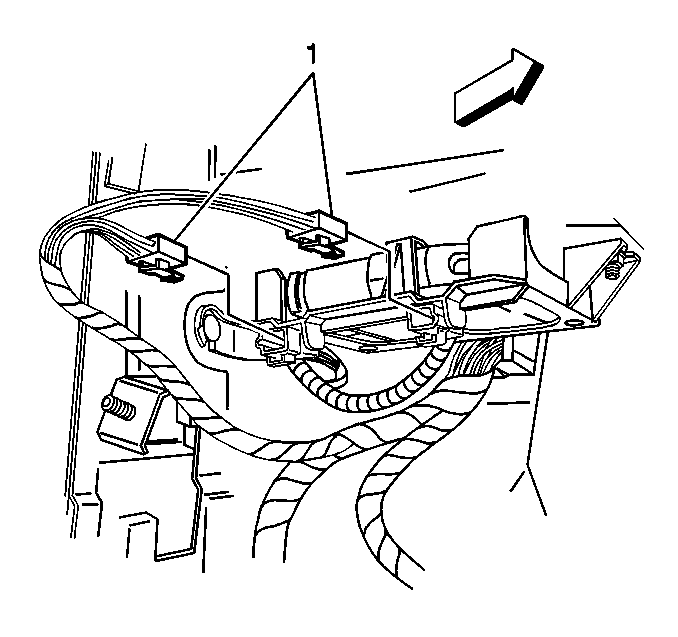
- Starting inside the vehicle,
disconnect the accel/cruise servo cable adjuster electrical connectors (1).
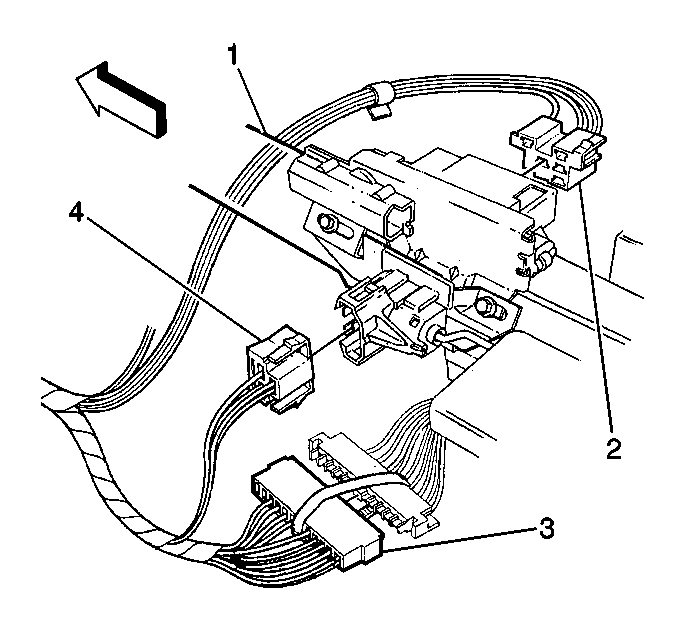
- Disconnect the following
connectors from the steering column (1):
| • | Remove the insulator from around the connector. |
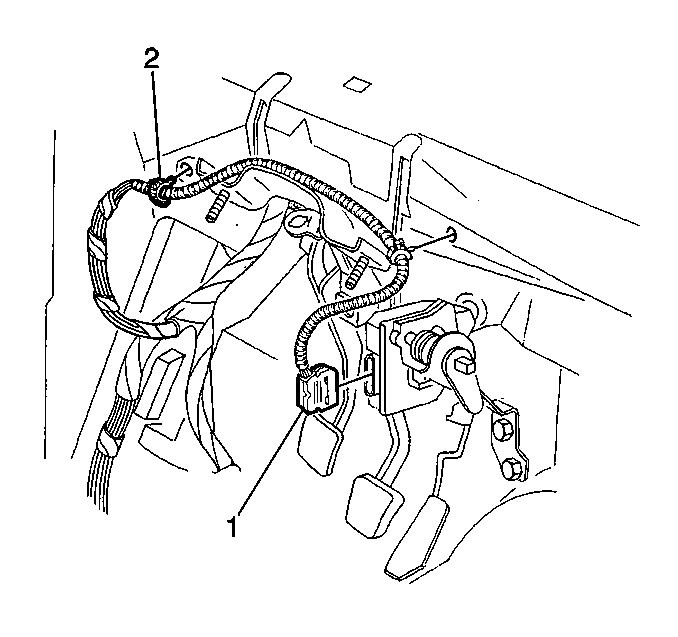
- Disconnect the electronic
throttle control (ETC) electrical connector (1), if equipped with a 3.8L engine.
- Disconnect the rosebud clips (2) from the dash mat.
- Raise and suitably support the vehicle. Refer to
Lifting and Jacking the Vehicle
in General Information.
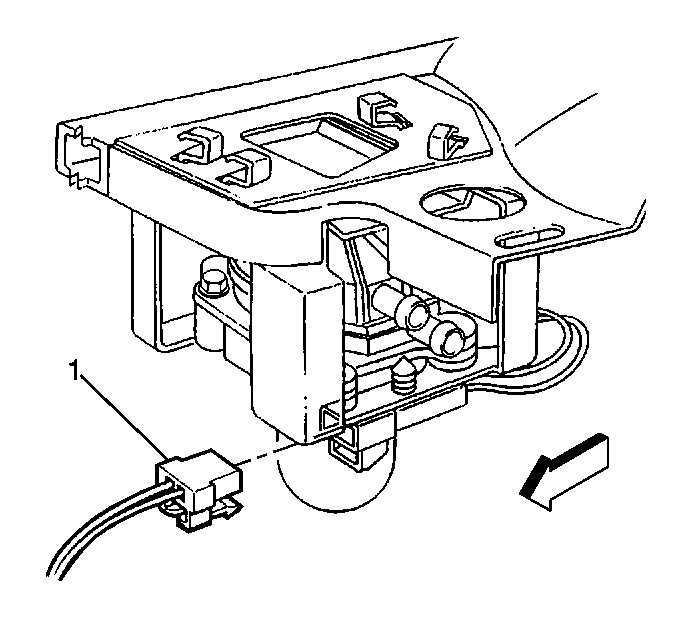
- Disconnect the secondary
air injection (AIR) pump connector (1), if equipped with a 3.8L engine.
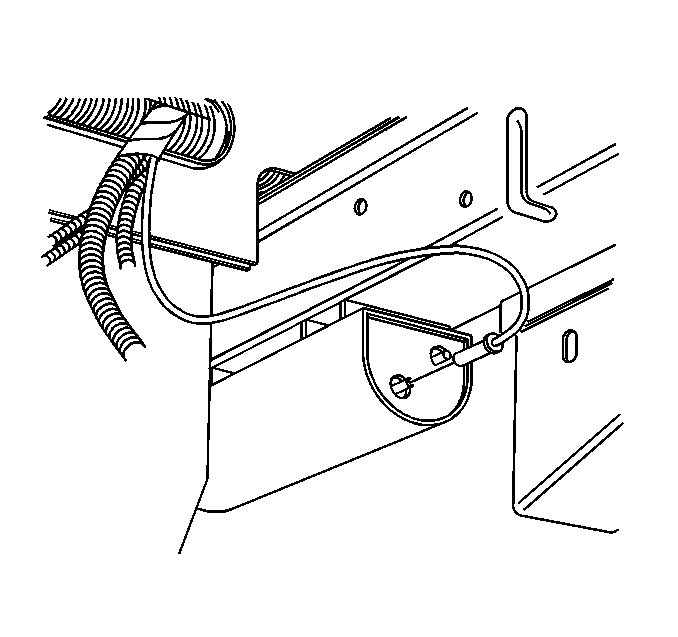
- Disconnect the vacuum
tank hose from the vacuum tank.
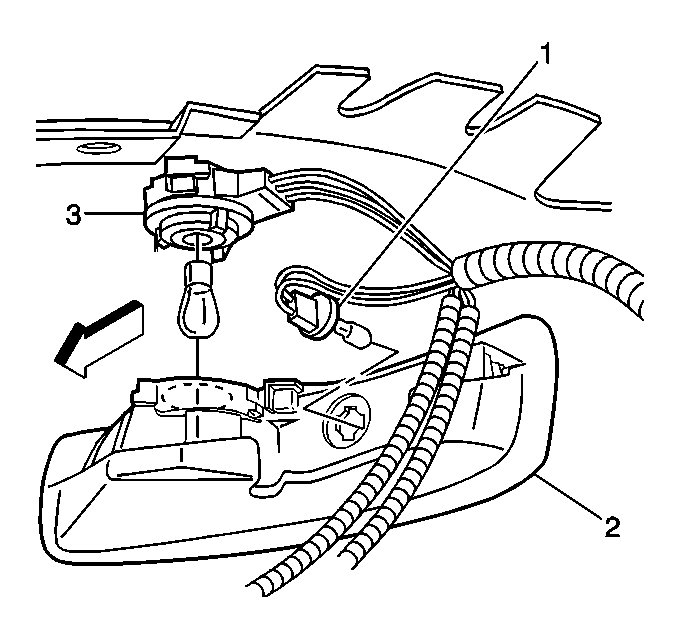
- Remove the park/turn signal
(3) and marker lamp (1) connector from the lamp (2).
- On Pontiac, disconnect the side marker lamp connector.
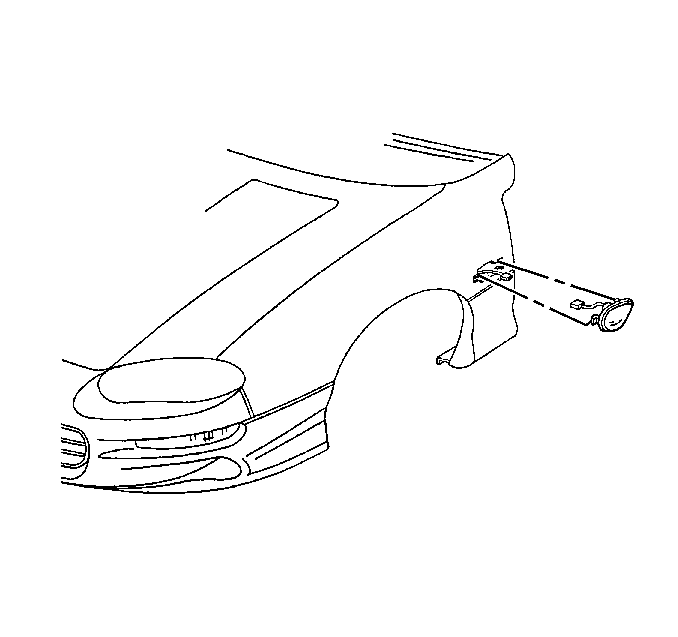
- Remove the side repeater
lamp (Export only).
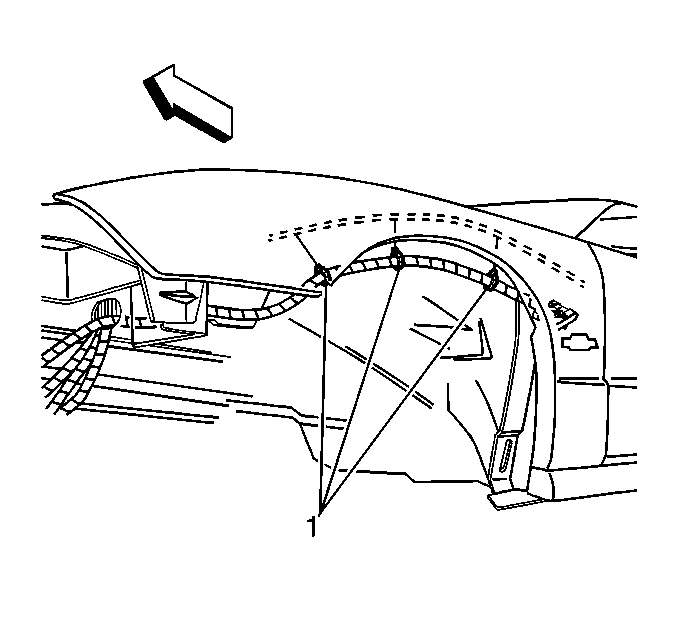
- Remove the harness clips
(1) from the fender rail. (Export only)
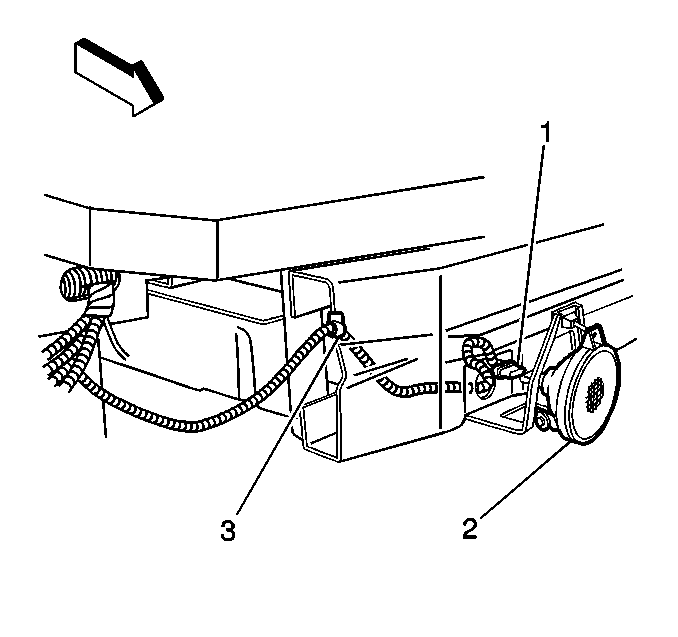
- Disconnect the connector
(1) from the fog lamp (2).
- Remove the clip (3) from the front bumper beam.
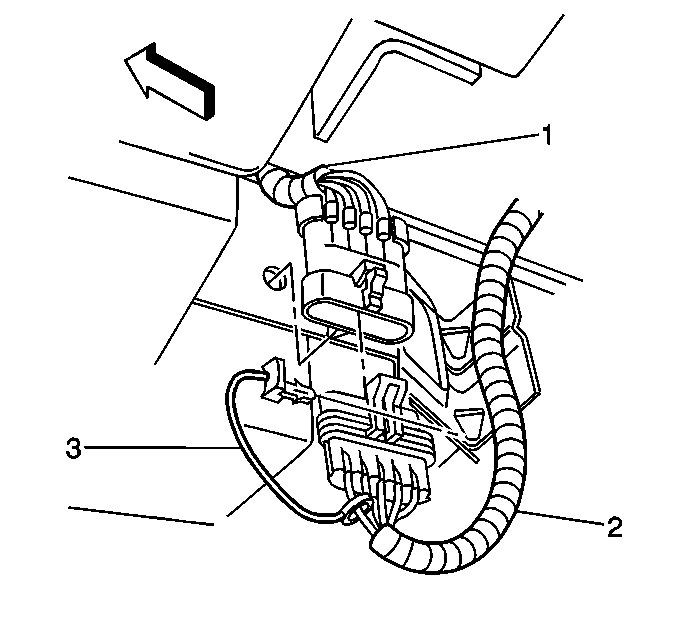
- Remove the secondary lock
retainer (3).
- Disconnect the headlamp jumper harness (2) from the forward lamp
harness (1).
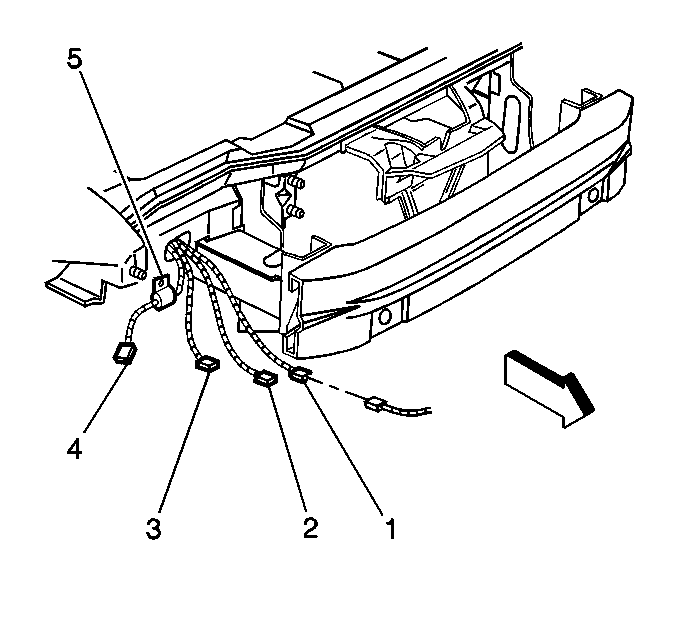
- Disconnect the inline
headlamp connector (1) from the forward lamp harness.
- Disconnect the rosebud clip (5) from the front end panel.
- Route the following through the front end panel hole.
| • | Park/turn signal connector (3) |
| • | Side marker connector (4), Pontiac only |
- Lower the vehicle.
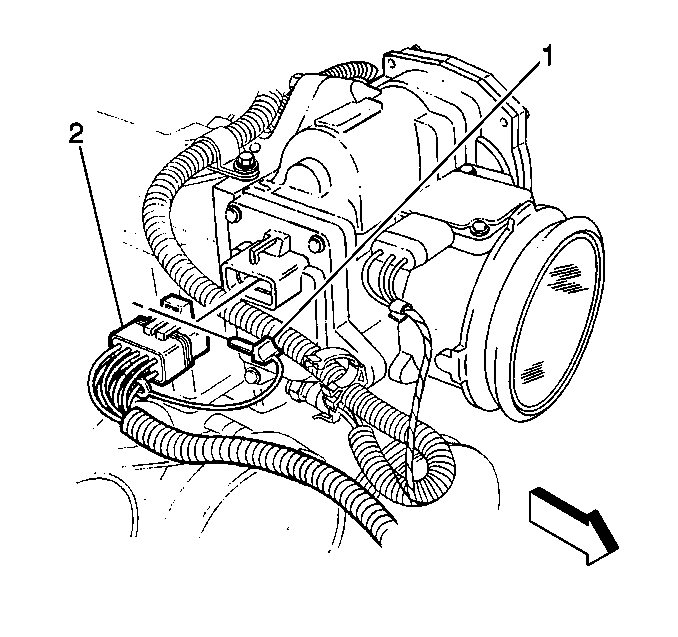
- Remove the captured secondary
lock (1) from the connector.
- Disconnect the ETC connector (2) from the throttle body, if equipped
with a 3.8L engine.
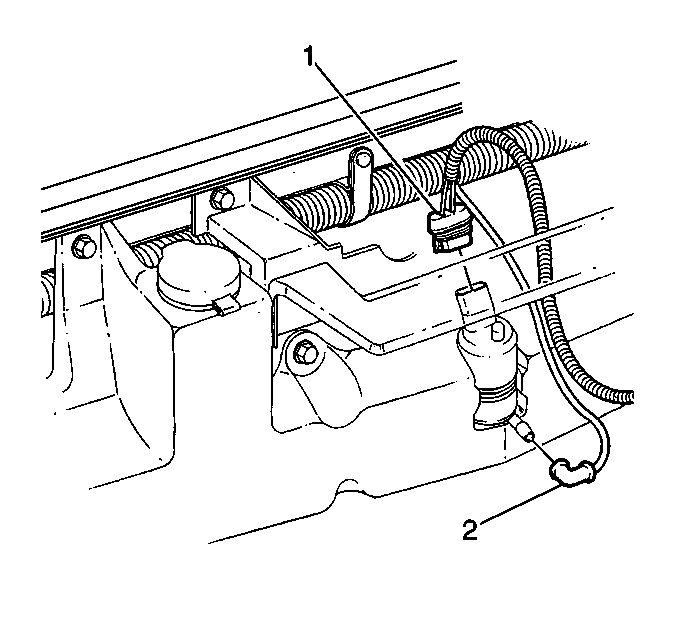
- Disconnect the washer
pump electrical connector (1).
- Disconnect the windshield washer fluid hose (2) from the pump.
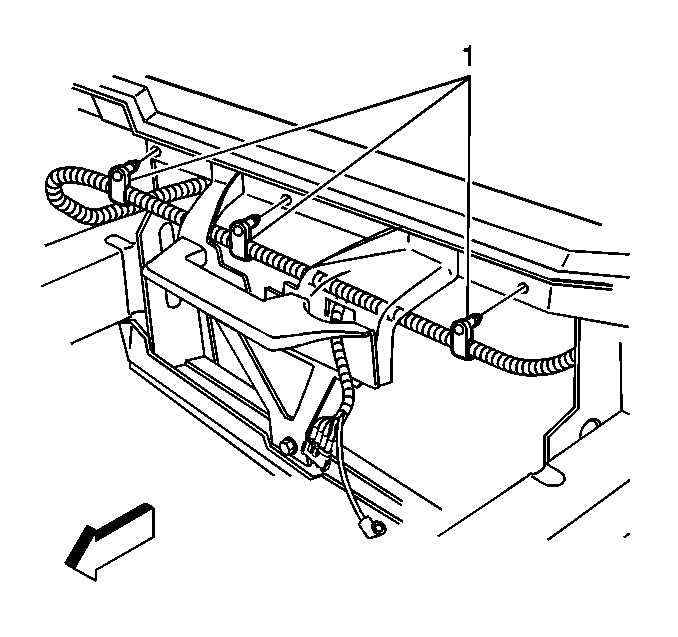
- Disconnect the forward
lamp wiring harness rosebud clips (1) from the tie bar.
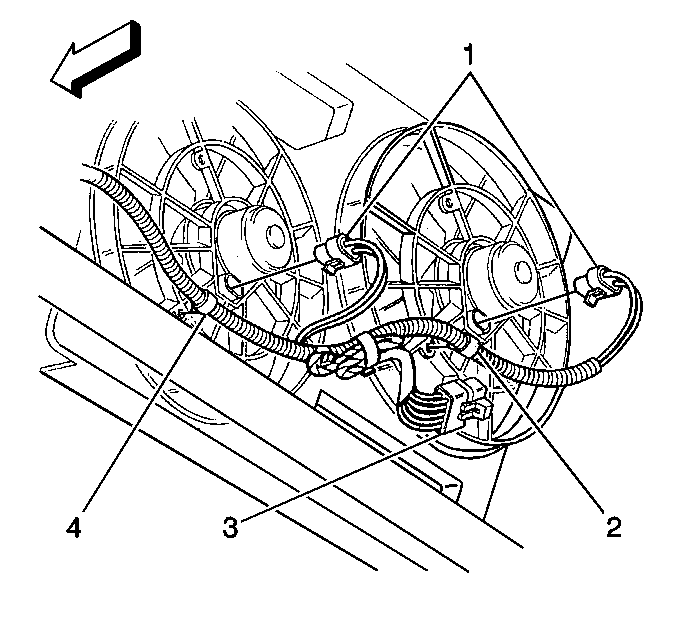
- Disconnect the cooling
fan electrical connectors (1).
- Disconnect the harness rosebud clips (2 and 4).
- Remove the battery. Refer to
Battery Replacement
.
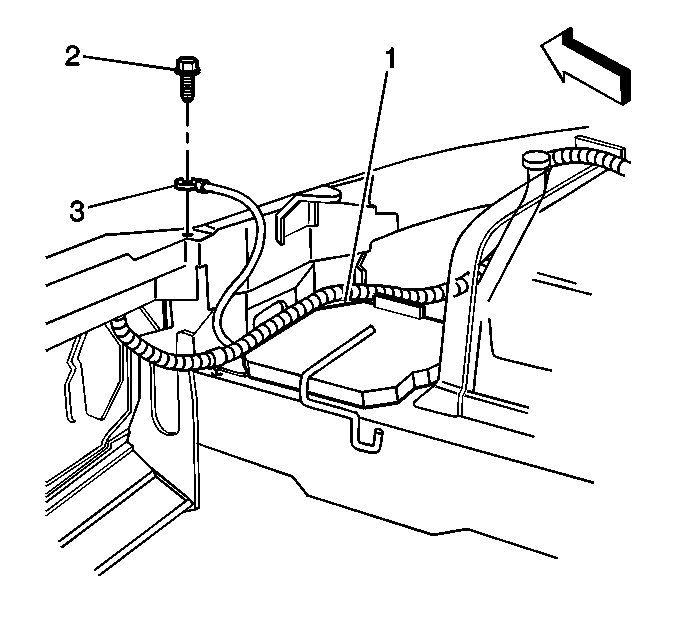
- Remove the right front
ground bolt (2).
- Remove the forward lamp wiring ground (3) from the tie bar.
- Remove the harness from the outboard of the battery tray (1).
- Remove the forward lamp harness headlamp branch through the hole
in the front panel.
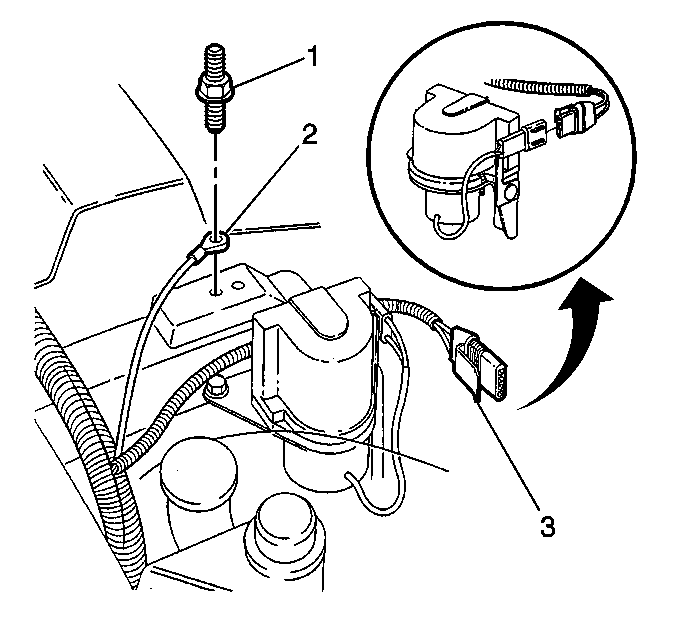
- Remove the forward lamp
harness ground stud (1).
- Remove the forward lamp harness ground (2).
- Disconnect the electronic throttle actuator electrical connector
(3), if equipped with a 5.7L engine.
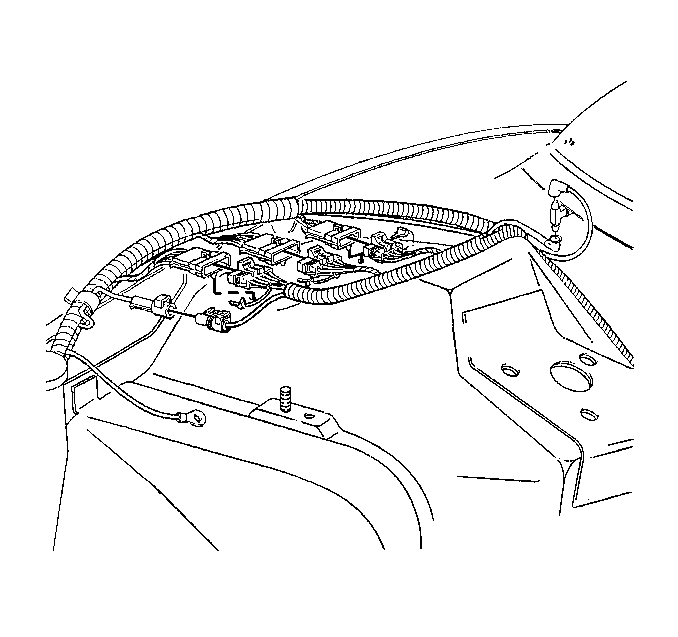
- Disconnect the secondary
captured locks.
- Disconnect the forward lamp harness from the engine harness.
- Disconnect the forward lamp harness vacuum tube from the top of
the vacuum check valve.
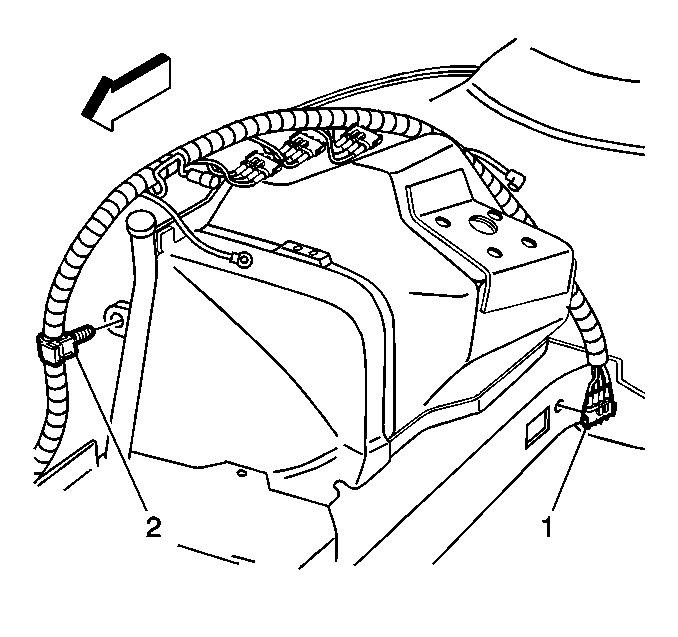
- Remove the speed sensor
connector (1) from the mid rail.
- Disconnect the harness rosebud (2) clip at the coolant fill neck.
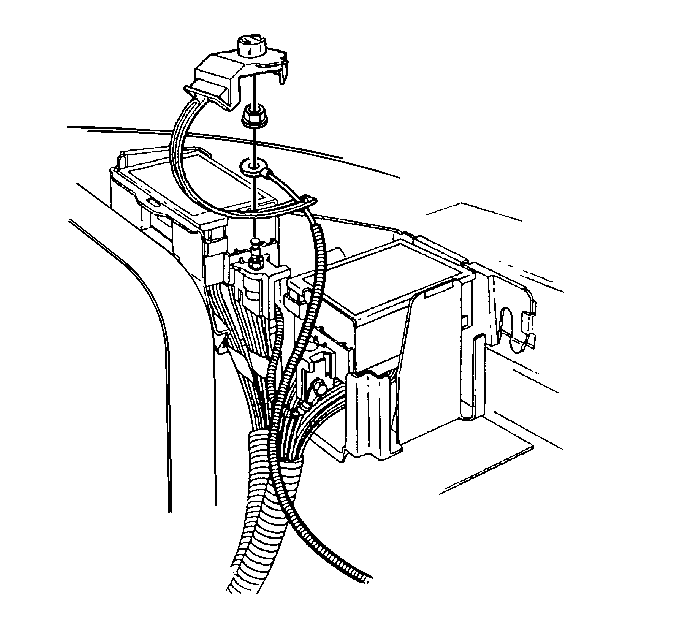
- Remove the positive battery
cable cover.
- Remove the positive battery cable nut.
- Remove the positive battery cable terminal from the fuseblock.
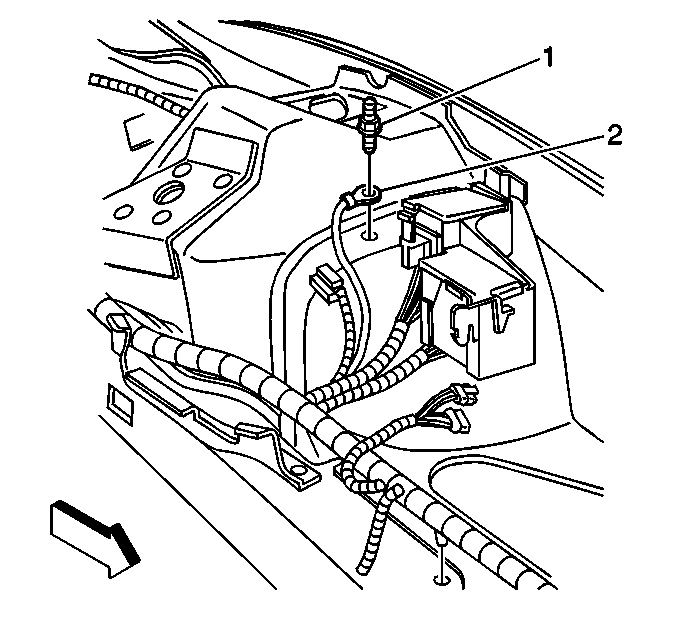
- Remove the ABS/SIR electrical
ground stud (1) from the wheelhouse panel.
- Remove the ABS/SIR electrical ground terminal (2) from the wheelhouse.
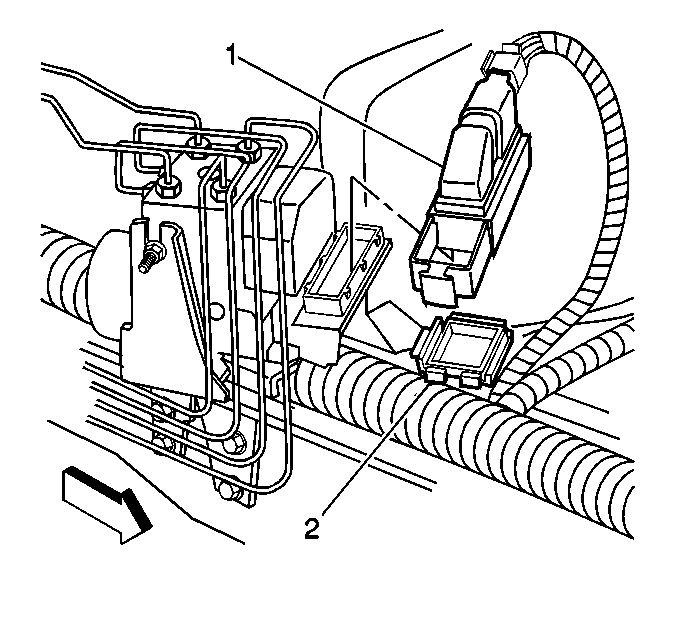
- Disconnect the 30 way
connector (1) from the brake pressure module valve.
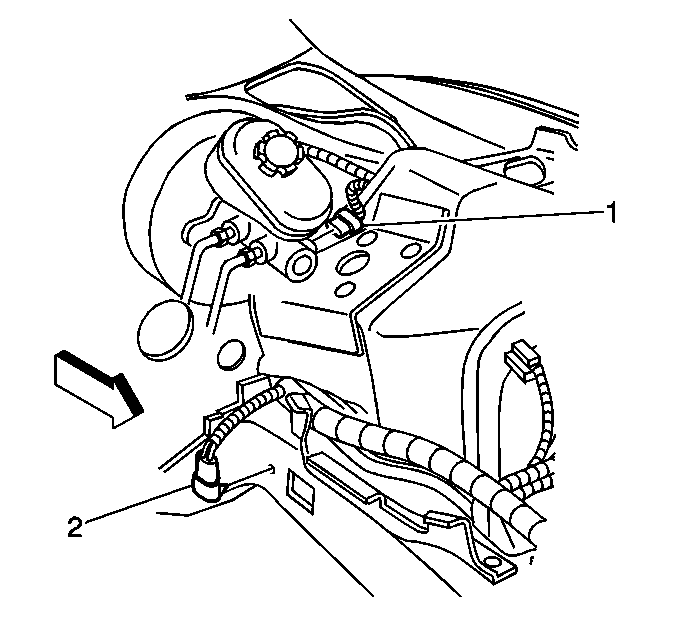
- Disconnect the brake fluid
level sensor connector (1) from the master cylinder.
- Remove the wheel speed sensor connector (2) from the mid rail.
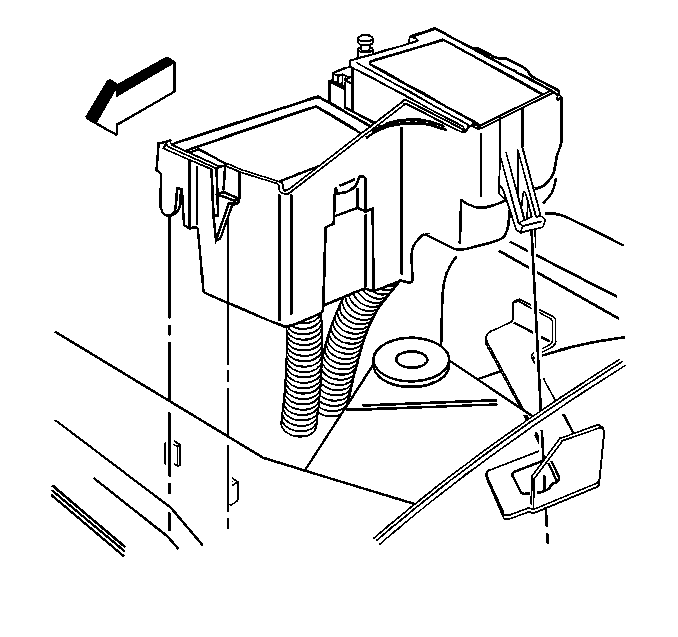
- Remove the undehood electrical
center from the wheelhouse bracket.
- Remove the air inlet grille panel. Refer to
Air Inlet Grille Panel Replacement
in Body Front
End.
- Disconnect the wiper motor electrical connector.
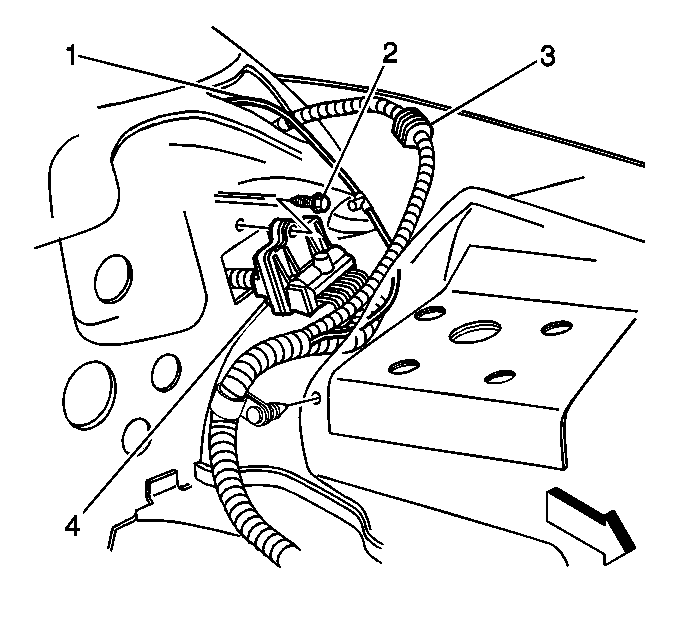
- Remove the wipe motor
harness branch from the plenum extension.
- Remove the windshield washer fluid hose from the plenum extension.
- Remove the forward lamp wiring harness grommet bolt (2).
- Remove the harness rosebud clip at the left wheelhouse panel.
- Gently, remove the forward lamp harness from inside the vehicle
through the front of dash opening.
- Remove the forward lamp wiring harness from the vehicle.
Installation Procedure
- Install the forward lamp
wiring harness to the vehicle.
- Route the forward lamp harness through the front of dash in the
interior of the vehicle.
- Install the harness rosebud clip to the left wheelhouse panel.
- Install the forward lamp wiring harness grommet bolt (2).
Tighten
Tighten the forward lamp wiring harness grommet bolt (2) to 8 N·m
(71 lb in).
- Install the windshield washer fluid hose to the plenum extension.
- Install the wiper motor branch to the plenum extension.
- Connect the wiper motor electrical connector.
- Install the air inlet grille panel. Refer to
Air Inlet Grille Panel Replacement
in Body Front
End.
- Perform the following
to Install the underhood electrical center to the wheelhouse bracket:
| 9.1. | Tilt the forward lamp harness bracket outboard. |
| 9.2. | Insert the tab on the bracket into the hole in the wheelhouse
bracket. |
| 9.3. | Roll bracket back inboard. |
| 9.4. | Secure bracket by sliding down into tabs on tie bar. |
- Install the wheel speed
sensor connector (2) to the mid rail.
- Connect the brake fluid level sensor connector (1) to the master
cylinder.
- Connect the 30 way connector
(1) to the brake pressure module valve.
- Install the ABS/SIR electrical
ground terminal (2) to the wheelhouse.
- Install the ABS/SIR electrical ground stud (1) to the wheelhouse
panel.
Tighten
Tighten the ABS/SIR electrical ground stud (1) to 14 N·m
(10 lb ft).
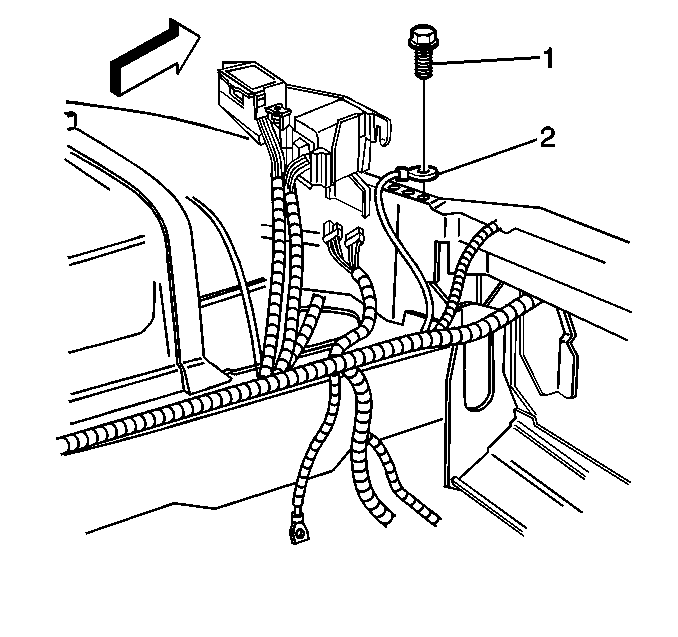
- Install the harness ground
wire (2) to the tie bar.
- Install the left front forward lamp wiring ground bolt (1).
Tighten
Tighten the left front forward lamp wiring ground bolt (1) to 10 N·m
(89 lb in).
- Install the positive battery
cable terminal to the fuseblock.
- Install the positive battery cable nut.
Tighten
Tighten the positive battery cable nut to 14 N·m (10 lb ft).
- Install the positive battery cable cover.
- Connect the harness rosebud
(2) clip to the coolant fill neck.
- Install the speed sensor connector (1) to the mid rail.
- Connect the forward lamp
harness vacuum tube to the top of the vacuum check valve.
- Connect the forward lamp harness to the engine harness.
- Connect the secondary captured locks.
- Connect the electronic
throttle actuator electrical connector (3), if equipped with a 5.7L engine.
- Install the forward lamp harness ground (2).
- Install the forward lamp harness ground stud (1).
Tighten
Tighten the forward lamp harness ground stud (1) to 16 N·m
(12 lb ft).
- Route the forward lamp
harness headlamp branch through the hole in the front panel.
- Tuck the harness into the opening forward of the battery tray
(1).
- Install the forward lamp wiring ground (3) to the tie bar.
- Install the right front ground bolt (2).
Tighten
Tighten the right front ground bolt (2) to 10 N·m (89 lb in).
- Install the battery. Refer to
Battery Replacement
.
- Connect the rosebud clips
(2 and 4).
- Connect the cooling fan electrical connectors (1).
- Connect the forward lamp
wiring harness rosebud clips (1) to the tie bar.
- Connect the windshield
washer fluid hose (2) to the pump.
- Connect the washer pump electrical connector (1).
- Connect the ETC connector
(2) to the throttle body, if equipped with 3.8L engine.
- Install the captured secondary lock (1) to the connector.
- Raise and suitably support the vehicle. Refer to
Lifting and Jacking the Vehicle
in General Information.
- Route the following through
the front end panel hole:
| • | Side marker connector (4), Pontiac only |
| • | Park/turn signal connector (3) |
- Connect the rosebud clip (5) to the front end panel.
- Connect the inline headlamp connector (1) to the forward lamp
harness.
- Connect the headlamp jumper
harness (2) to the forward lamp harness (1).
- Install the secondary lock retainer (3).
- Install the clip (3) to
the front bumper beam.
- Connect the fog lamp connector (2) to the lamp.
- Install the harness clips
(1) to the fender rail. (Export only)
- Install the side repeater
lamp. (Export only)
- Install the park/turn
signal (3) and marker (1) connector to the lamp (2).
- On Pontiac, connect the side marker lamp connector.
- Connect the vacuum tank
hose to the vacuum tank.
- Connect the AIR pump connector
(1), if equipped with a 3.8L engine.
- Lower the vehicle.
- Connect the rosebud clips
(2) to the dash mat.
- Connect the ETC electrical connector (1), if equipped with a 3.8L
engine.
- Connect the following
connector to the steering column (1):
| • | Install the insulator around the connector. |
- Connect the accel/cruise
servo cable adjuster electrical connectors (1).
- Connect the negative battery
cable. Refer to
Battery Negative Cable Disconnection and Connection
.
