Powertrain Control Module Replacement for Pontiac Grand Prix 2002
Service of the powertrain control module (PCM) should normally consist of either replacement of the PCM or electrically erasable programmable read only memory (EEPROM) programming. If the diagnostic procedures call for PCM replacement, inspect the PCM first to see if the replacement is the correct part. If the PCM is faulty, remove the PCM and install the new service PCM.
The new service PCM will not be programmed. You must program the new PCM. DTC P0602 indicates the EEPROM is not programmed or has malfunctioned.
Notice: Do not touch the connector pins or soldered components on the circuit board in order to prevent possible electrostatic discharge (ESD) damage to the PCM.
Notice: Turn the ignition OFF when installing or removing the PCM connectors and disconnecting or reconnecting the power to the PCM (battery cable, PCM pigtail, PCM fuse, jumper cables, etc.) in order to prevent internal PCM damage.
Removal Procedure
- Using a scan tool, retrieve the percentage of remaining engine oil. Record the remaining engine oil life.
- Disconnect the negative battery. Refer to Battery Negative Cable Disconnection and Connection in Engine Electrical.
- Remove the 3 bolts from the inner fender brace and remove the brace.
- Remove the air cleaner intake duct. Refer to Air Cleaner Inlet Duct Replacement .
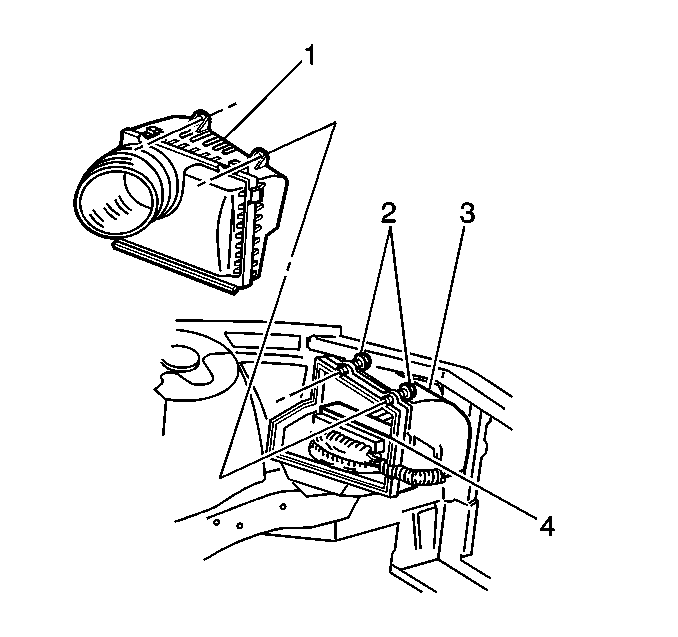
- Remove the 2 screws (2) securing the air cleaner housing (1) to the PCM housing (3).
- Remove the air cleaner housing assembly (1).
- Without disconnecting the PCM connectors, remove the PCM and harness from the PCM housing (3).
- Disconnect the PCM connectors.
Important: It is necessary to record the remaining engine oil life. If the replacement module is not programed with the remaining engine oil life, the engine oil life will default to 100%. If the replacement module is not programmed with the remaining engine oil life, the engine oil will need to be changed at 5000 km (3,000 mi) from the last engine oil change.
Installation Procedure
Notice: Refer to Fastener Notice in the Preface section.
- Reconnect the PCM connectors.
- Carefully install the PCM and harness into the PCM housing (3).
- Install the air cleaner housing assembly (1).
- Install the 2 screws (2) securing the air cleaner housing (1) to the PCM housing (3).
- Install the air cleaner intake duct. Refer to Air Cleaner Inlet Duct Replacement .
- Position the inner fender brace and install the 3 bolts.
- Connect the negative battery. Refer to Battery Negative Cable Disconnection and Connection in Engine Electrical.
- The replacement PCM will NOT allow secondary air injection (AIR) pump operation until a total of 16 km (10 miles) have been accumulated.
- The new PCM must be programmed. Refer to Powertrain Control Module Programming .
Tighten
Tighten the connectors to 8 N·m (71 lb in).
